Lab 6 - Image Processing
Summary
In this lab, you will learn how to process an image using histogram equalization and 2-D convolution. An example of the final solution can be found here.
Downloads
Python
As in Lab 6, your task for the Python portion of this lab will be to prototype your Android system. You will be given an target test image and you will apply histogram equalization to it or you will perform 2-D convolution using a given kernel.
Part 1 - Histogram Equalization

We will be applying histogram equalization to eco.tif. Recall from the prelab, histogram equalization is a technique for adjusting image intensities to enhance contrast. It is done by the following procedure.
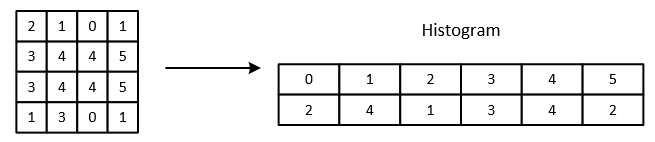
Compute Histogram of Image
Histogram is the statistic representation of an image. It records the number of times that a certain intensity value appears in the entire image. A simple example is shown below:
Question
Your histogram can be represented simply as an array. What size will the array need to be? What type?
Compute CDF of Histogram
Next, you must compute the cumulative distribution function (CDF) of your histogram. CDF(x) is the number of pixels whose value is less or equal than x. After computing CDF, you must make sure to normalize your CDF so that the range is 0 to 65535 (uint16). The formula for normalization is:
where cdfmin is the minimum non-zero value of the cumulative distribution function, M x N gives the image's number of pixels (where M is width and N the height) and L is the number of gray levels used (65536 for uint16). reference
Apply Histogram Equalization
Substitute each of the pixel value of your original picture to the new normalized CDF value you just computed.
Assignment 1
Implement the Python system (histeq() in lab6Histeq.py) described above, and show the result of the image after applying Histogram Equalization. These plot will count for 1 demo points.
Part 2 - 2-D Convolution
The idea of 2-D Convolution is relatively straight forward. You'll apply the filter to every pixel in the image and substitute the pixel value with the convolution result. Here, we assume that the picture is padded with zeros around the edges, which means that when the kernel is applied to the edge pixels, we treat the values out of the image boundaries as zeros.
Note
Same as 1-D convolution, we need to flip the entire filter before applying convolution. Make sure you remember this! However, most image filters are central symmetric, so the results will still be the same even if you forgot to deal with the filter.
If you have any questions about how to perform 2-D convolution, refer to the example here. More explanation and examples of 2-D Convolution
In python, we will apply 2-D convolution to two images, kitten.png and logo.png, both are RGB pictures, so you will have to apply 2-D convolution to all three channels. Your code should be general enough to take in images or kernels of different sizes. Pay attention to the data type, the images are typically of uint8 type, while the kernels are often of double type.
Assignment 2
Implement the Python system (conv2() in lab6Conv2.py) described above, and show the result of the image after applying Convolution. The entire code may take a long running time up to 80 seconds. These plot will count for 1 demo points.
Part 3 - System Requirements
The Python test code has been given to mimic the final Android system. You will get an input image eco.tif of size 512 X 672, and you will apply histogram equalization to it. The result should be very similar to the result in prelab. Some things to think about:
Question
- How would you like to store your intermediate results, like histogram and CDF? What could you do to make them more efficient?
- Why do we need to normalize CDF and how does it works?
Android
For this lab, we will be implementing in Java, which has a very similar syntax with C++. If you've implemented your Python system without relying on many built-ins, it should translate nicely to Android. Your code will reside in java\com\ece420\lab6.
Part 4 - Data Specification
It is worth mentioning that the frame images that you'll get from the Android camera is a little different. Instead of the commonly know RGB color space you would think of, the Android default camera images are generated in the YUV color space. More specifically, the data is in Y'UV420p(NV21) format. The YUV color space is actually more intuitive to the human interpretation of vision, for the Y channel encodes the luma component (brightness), and the U and V are the chroma (color) components. Simply speaking, the Y channel will be containing most of the information of the image, and this is why we will only manipulate this channel. More explanation of YUV specifications and why YUV is preferred over RGB can be find here and here. You don't need to understand how YUV works other than we are only manipulating the Y channel, but please pay attention to the following description.
Similar to audio processing, the Android Camera Hardware will provide you with image frames when they are ready, but the frames is given in a 1-D array as byte[] data, instead of a 2-D array.
Following the YUV format, if we have an image of M x N, the byte[] data array we get will be of length M x N x 1.5, as shown below:
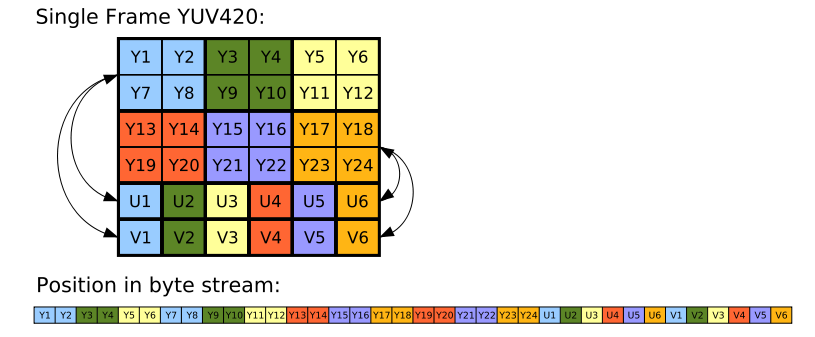
Since we are only manipulating the Y channel which contains intensity information, we only need to manipulate the part within range data[0 : M x N - 1].
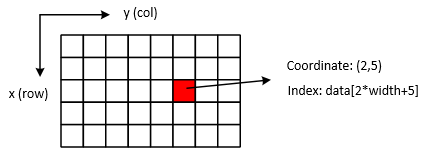
Part 5 - Image Coordinates
The coordinate of images are shown in the figure below. The x-axis corresponds to the row/height and the y-axis corresponds col/width. The transformation of 2-D image index to 1-D data index is simple.
Part 6 - Other Explanations
Our Tablet camera has a very powerful camera with a high resolution, but to cater our need for this lab, we are setting the camera to generate image frames of 640 X 480. Also the preview image has been rotated 90 degrees to accomadate protrait mode. There is a part in the java file that change the camera settings, feel free to play with it.
Attention
Android devices tend to have limited performance when battery is low. It is because the system is designed to turn off a lot of hardware resources when the battery gets too low so that the device will last for longer. Make sure your tablet is fully charged before demo or your app might be slower than your algorithm should expect.
The kernels that we uses are of size 3 X 3, you may assume this will not change, but it won't hurt to implement your code that could adapt kernels of any size.
The entire code works in an callback fashion as before. The camera preview is drawn to the 'surfaceView' object automatically handled by the Android Camera Class. Each time a new frame ready, the callback function is called and provided with the new frame data byte[] data. Inside, the callback function, we setup the function that will pass the input frame data to your function (histeq() and conv2). Your output will be further manipulated to create the RGB or Grayscale bitmap and then drawn to another 'surfaceView' object down below.
Assignment 3
Implement the Histogram Equalization and 2-D Convolution in java\com\ece420\lab6. The function you will need to implement are histeq() and conv2() at the end of the entire code.
The Android implementation will count for two demo points.
Question
- Under which scenario will the histogram equalization make a significant difference?
- How many computations do you need to do for each frame 2-D convolution.
Attention
For Histogram Equalization on Android, you will be working with directly uint8_t (or byte) types, the scaling is now from 0 to 255. Also, Java byte type is signed, meaning that pixel value 255, which is 0xFF, will be interpreted as -1 by the compiler, be careful we you use byte data directly.
Submission Instruction
Refer to the Submission Instruction page for more information.
Grading
Lab 2 will be graded as follows:
-
Prelab [2 points]
-
Lab [4 points]
- Python:
- Assignment 1 [1 point]
Histogram equalization implementation [1 point]
- Assignment 2 [1 point]
2-D convolution implementation [1 point]
- Assignment 1 [1 point]
- Android:
- Assignment 3 [2 points]
Histogram equalization implementation [0.5 point]
2-D convolution implementation [0.5 point]
Camera not stucked or skipping too many frames [0.5 point]
Filter functionality and app demo [0.5 point]
- Assignment 3 [2 points]
- Python:
-
Quiz [2 points]