Linx

How to Use the LC Series LINX Modules

by Lee Rumsey

These are basic instructions on hooking up the modules. This document is split into five nifty sections:

For data sheets on the LINX modules, see this web site: http://www.linxtechnologies.com. Click on the RF Modules link. Then click on the Manuals item under the LC Series heading. READ through the LC Series data sheets to get an understanding of their function. This will reduce the likelihood of errors.

Necessary Parts

TX board (1) Smaller PC board; has TXM-XXX-LC chip on it
RX board (1) Larger PC board; has RXM-XXX-LC chip on it
Antenna (2) Either whips or helical antennas
RG-174 50W coax cable Available from ECE Store; for connecting antennas
22 ga hookup wire Should be laying around the 445 lab
390 W, 1/4 W resistor (1) Needed for 5V operation

Before we start

  1. Learn to solder. You will be making some delicate connections, so practice if you don't know how. Also be sure to use solder sparingly- big blobs will likely result in damage or malfunctions.
  2. You should have the parts listed above. Get them from a TA.
  3. Make sure the transmitter and receiver are running on the same frequency. Do this by checking the model number on the surface mount package. For example, a 418 MHz TX module will be labeled TXM-418-LC, and a 315 MHz RX module will be RXM-315-LC.

Transmitter Assembly

The LINX transmitter is the smaller of the two modules. It runs on between +2.7 and 5.2 VDC. We will use a +5 VDC power supply, so that the data input can be a TTL level signal. DO NOT apply a voltage greater than Vcc on the data input pin!

Step 1. Acclimate yourself with the circuit we are building:
schematic

Step 2. Place the TX board with chip side facing UP. The writing on the chip should be right side up, with a little wire coming off the top. This wire is GROUND. A '1' or a small dot should be visible on the lower left-hand corner of the chip. GROUND is also connected to the center bus strip on the board.

Step 3. Solder the 390 W resistor from pin 4 (lower right-hand corner) to ground. This sets the chip to accept 5 VDC. NOTE: make all connections on the top of the board. DON'T feed any leads through the holes. There are connections on the other side!

Step 4. Carefully solder a 3-inch wire to pin 2. This will be the DATA input. DO NOT apply a voltage greater than Vcc on the data input pin!

Step 5. Carefully solder a 3-inch wire to pin 7. This will be the VCC power input. REMEMBER: +5 VDC ONLY on this pin!

Step 6a. If you have a HELICAL COIL antenna, solder a short (2 inch) length of coax cable to pin 5 and GROUND. The inner conductor is the RF signal, and the outer shield goes to GROUND. Now solder the helical coil to the other end of the coax to form a magnetic loop. (You may need to extend the shield connection with a separate wire.)

Step 6b. If you have a WHIP antenna, solder the coax cable directly to pin 5 and GROUND. The inner conductor is the RF signal, and the outer shield goes to GROUND.

Here is the completed TX board assembly:
board


Receiver Assembly

The LINX receiver is the larger of the two modules. It runs on between +4 and 5.2 VDC. We will use a +5 VDC power supply. GROUND is the center vertical strip on the solder side.

Step 1. Acclimate yourself with the circuit we are building:
circuit

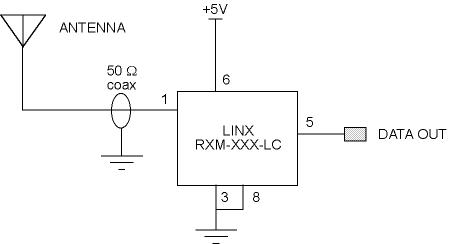
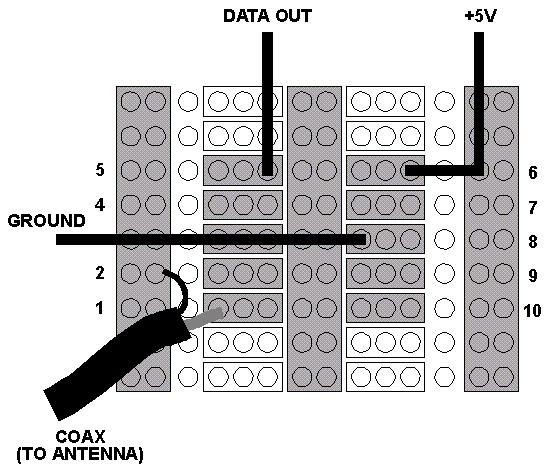
Step 2. Place the RX board with chip side facing DOWN, with the solder side UP. Orient the board so that one wire comes off the top, while another comes off the left of the board. The top wire is the power connection; the left wire is ground. Pin 1 of the chip is actually at the lower left with this orientation; it is identified on the chip by a '1' or a dot.

Step 3. Carefully solder a 3-inch wire to pin 5 (top left solder pad connected to the chip). This will be the DATA output.

Step 4a. If you have a HELICAL COIL antenna, solder a short (2 inch) length of coax cable to pin 1 and GROUND. The inner conductor is the RF signal, and the outer shield goes to GROUND. Now solder the helical coil to the other end of the coax to form a magnetic loop. (You may need to extend the shield connection with a separate wire.)

Step 4b. If you have a WHIP antenna, solder the coax cable directly to pin 1 and GROUND. The inner conductor is the RF signal, and the outer shield goes to GROUND.

Step 5. IMPORTANT! If there is a connection to pin 10 on the Linx chip, carefully desolder it, leaving the others intact. It is misconnected.

Here is the completed RX board assembly:
complete


Testing and Operation

Now we'll see if these modules work. If you are working with 418 MHz chips, then a reference receiver - transmitter pair are available for testing. Otherwise, you better hope you made the right connections? we don't have anything to test the 315 MHz RX/TX chips, except maybe another functioning pair of modules.

Step 1. TESTING THE TRANSMITTER. Refer to the schematic for the TX module we just assembled. Connect +5 VDC to the power lead, and ground the GROUND lead.

Step 2. Turn on or plug in the power. Use +5 VDC only! If anything is heating up, UNPLUG the module and check your connections!

Step 3. Set up a function generator the make a 1 kHz TTL compatible square wave (i.e. it swings between 0 and +5V only!) Connect this signal to the data input lead from the module. If anything is heating up, UNPLUG the module and check your connections!

Step 4. Plug the data output of the reference receiver into an oscilloscope. ASK A TA FOR ASSISTANCE! If all is well, a 1 kHz square wave should appear on the screen. You are done; wire your module into the rest of your circuit.

NOTE: For a flaky power supply, a bypass capacitor (10 uF electrolytic) may be necessary between power and ground on YOUR board.

Step 5. TESTING THE RECEIVER. Refer to the schematic for the RX module we just assembled. Connect +5 VDC to the power lead, and ground the GROUND lead

Step 6. Turn on or plug in the power. Use +5 VDC only! If anything is heating up, UNPLUG the module and check your connections!

Step 7. Set up a function generator the make a 1 kHz TTL compatible square wave (i.e. it swings between 0 and +5V only!) Connect this signal to the data input on the reference transmitter. ASK A TA FOR ASSISTANCE! If anything is heating up, UNPLUG the module and check your connections!

Step 8. Connect the data output of your receiver module into an oscilloscope. If all is well, a 1 kHz square wave should appear on the screen. You are done; wire your module into the rest of your circuit.

THE END.

WHEELED-LEGGED BALANCING ROBOT

Gabriel Gao, Jerry Wang, Zehao Yuan

WHEELED-LEGGED BALANCING ROBOT

Featured Project

# WHEELED-LEGGED BALANCING ROBOT

## Team Members:

- Gabriel Gao (ngao4)

- Zehao Yuan (zehaoy2)

- Jerry Wang (runxuan6)

# Problem

The motivation for this project arises from the limitations inherent in conventional wheeled delivery robots, which predominantly feature a four-wheel chassis. This design restricts their ability to navigate terrains with obstacles, bumps, and stairs—common features in urban environments. A wheel-legged balancing robot, on the other hand, can effortlessly overcome such challenges, making it a particularly promising solution for delivery services.

# Solution

The primary objective of this phase of the project is to demonstrate that a single leg of the robot can successfully bear weight and function as an electronic suspension system. Achieving this will lay the foundation for the subsequent development of the full robot.

# Solution Components

## Subsystem 1. Hybrid Mobility Module:

Actuated Legs: Four actuator motors (DM-J4310-2EC) power the legged system, enabling the robot to navigate uneven surfaces, obstacles, and stairs. The legs also functions as an advanced electromagnetic suspension system, quickly adjusting damping and stiffness to ensure a stable and level platform.

Wheeled Drive: Two direct drive BLDC (M3508) motors propel the wheels, enabling efficient travel on flat terrains.

**Note: 4xDM4310s and 2xM3508 motor can be borrow from RSO: Illini Robomaster** - [Image of Motors on campus](https://github.com/ngao4/Wheel_Legged_Robot/blob/main/image/motors.jpg)

The DM4310 has a built in ESC with CAN bus and double absolute encoder, able to provide 4 nm continuous torque. This torque allows the robot or the leg system to act as suspension system and carry enough weight for further application. M3508 also has ESC available in the lab, it is an FOC ESC with CAN bus communication. So in this project we are not focusing on motor driver parts. The motors would communicate with STM32 through CAN bus with about 1 kHz rate.

## Subsystem 2. Central Control Unit and PCB:

An STM32F103 microcontroller acts as the brain of the robot, processing input from the IMU through SPI signal, directing the motors through CAN bus. The pcb includes STM32F103 chip, BMI088 imu, power supply parts and also sbus remote control signal inverter.

Might further upgrade to STM32F407 if needed.

Attitude Sensing: A 6-axis IMU (BMI088) continuously monitors the robot's orientation and motion, facilitating real-time adjustments to ensure stability and correct navigation. The BMI088 would be part of the PCB component.

## Subsystem 3. Testing Platform

The leg will be connected to a harness as shown in this [sketch](https://github.com/ngao4/Wheel_Legged_Robot/blob/main/image/sketch.jpg). The harness simplifies the model by restricting the robot’s motion in the Y-axis, while retaining the freedom for the robot to move on the X-axis and jump in the Z-axis. The harness also guarantees safety as it prevents the robot from moving outside its limit.

## Subsystem 4. Payload Compartment (3D-printed):

A designated section to securely hold and transport items, ensuring that they are protected from disturbances during transit. We will add weights to test the maximum payload of the robot.

## Subsystem 5. Remote Controller:

A 2.4 GHz RC sbus remote controller will be used to control the robot. This hand-held device provides real-time control, making it simple for us to operate the robot at various distances. Safety is ensured as we can set a switch as a kill switch to shutdown the robot in emergency conditions.

**Note: Remote controller model: DJI DT7, can be borrow from RSO: Illini Robomaster**

The remote controller set comes with a receiver, the output is sbus signal which is commonly used in RC control. We would add an inverter circuit on pcb allowing the sbus signal to be read by STM32.

Note: When only demoing the leg function, the RC controller may not be used.

## Subsystem 6. Power System

We are considering a 6s (24V) Lithium Battery to power the robot. An alternative solution is to power the robot through a power supply using a pair of long wires.

# Criterion For Success

**Stable Balancing:** The robot (leg) should maintain its balance in a variety of situations, both static (when stationary) and dynamic (when moving).

**Cargo Carriage:** The robot(leg) can be able to carry a specified weight (like 1lb) without compromising its balance or ability to move.

_________________________________________________________________________

**If we are able to test the leg and function normally before midterm, we would try to build the whole wheel legged balancing robot out. It would be able to complete the following :**

**Directional Movement:** Via remote control, the robot should move precisely in the desired direction(up and down), showcasing smooth accelerations, decelerations, and turns.

**Platform Leveling:** Even when navigating slopes or uneven terrains, the robot should consistently ensure that its platform remains flat, preserving the integrity of the cargo it carries. Any tilt should be minimized, ideally maintaining a platform angle variation within a range of 10 degrees or less from the horizontal.

**Position Retention:** In the event of disruptions like pushes or kicks, the robot should make efforts to return to its original location or at least resist being moved too far off its original position.

**Safety:** During its operations, the robot should not pose a danger to its surroundings, ensuring controlled movements, especially when correcting its balance or position. The robot should be able to shut down (safety mode) by remote control.

Project Videos